

Get Started with Google Shopping - New Zealand Setup Guide
We’ve trudged through Google’s “help” guides so that you don’t have to. Read clear, concise, straightforward info to get started with Google Shopping in NZ.


We’ve spent more than a few hours trudging through Google’s “help” guides, so that you don’t have to. 😉We’re here to give you a clear, concise, straightforward walkthrough to get you started with Google Shopping in NZ.
Table of Contents
- What do I need to get started?
- What is Google Shopping?
- What do Google Shopping products appear?
- Google Search tab
- Google Images tab
- Google Shopping tab
- Google Display Network (with dynamic remarketing)
- What is Google Merchant Center?
- How do I set up a Google Merchant Center account?
- What is a product feed?
- How do I create a product feed?
- How do I upload a product feed to Google Merchant Center?
- Direct integration with Shopify, WooCommerce, etc
- Creating & submitting your own product feed
- Google Sheets
- Scheduled fetch
- Upload
- Website crawl
- Content API
- How do I link Google Merchant Center to Google Ads?
- How do I set up a Shopping campaign in Google Ads?
- Campaign settings
- Linking the product feed
What do I need to get started?
- A Google Ads account
- A Google Merchant Centre account
- A Google account with access to both of the above
- An eCommerce website
- A product feed
What is Google Shopping?
First launched in New Zealand in 2017, Google Shopping is most widely known as the image-based product ads found towards the top of the Google search results. Google Shopping works by reviewing product information from your eCommerce product feed, and matching them to relevant user keyword searches to serve ads. Google Shopping encompasses more than just paid ads. Shopping products are eligible to appear in unpaid product listings, which retailers can opt-in to listings for free. These can appear across various “Google surfaces”, which we will explore shortly.
Where do Google Shopping products appear?
Google Search tab
When you conduct a Google search, paid Google Shopping ads appear at the very top of the main search results page.
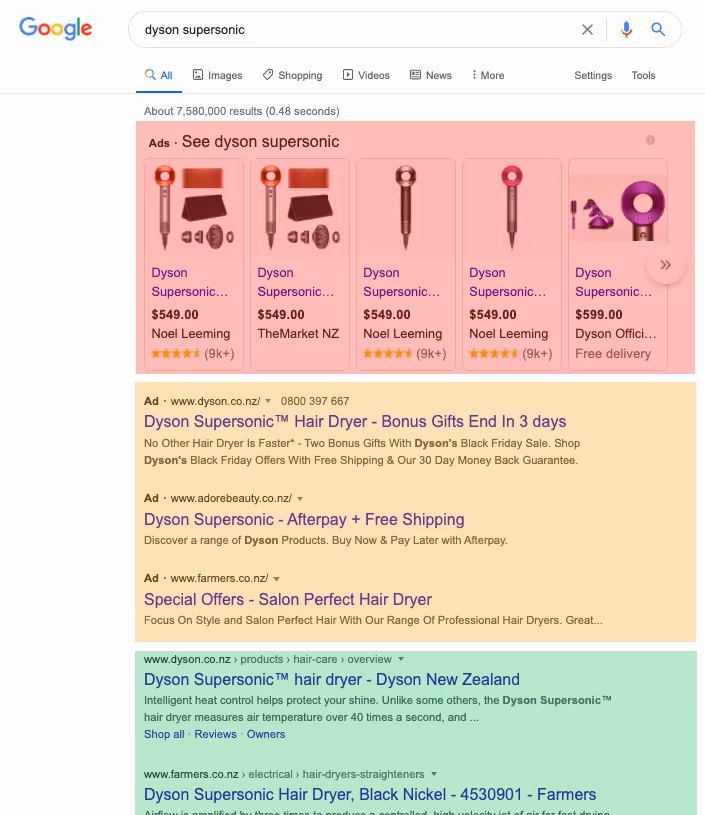
Paid Shopping ads (in red) as they appear in the main Google search results page. Also shown are Google Ads Search ads (in yellow) and unpaid organic search results (in green).
Google Images tab
Paid Shopping ads appear at the top of the Images tab, in a similar manner to the main Google search results page. Unpaid Shopping products can also appear in the Images tab (highlighted in green in the image below). A small label icon to the bottom left of the product image denotes that this is an unpaid product result.
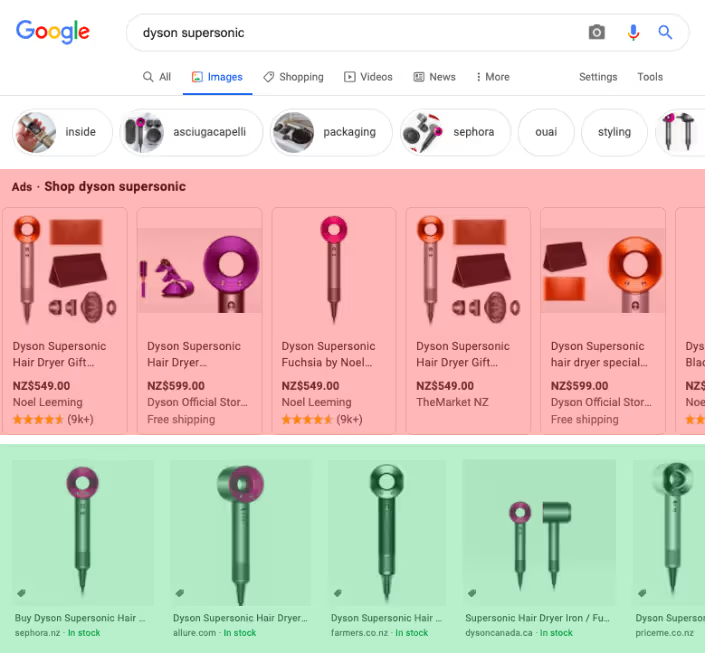
Paid Shopping ads (in red) and unpaid Shopping products (in green) as they appear in the Google Images tab.
Google Shopping tab
The Google Shopping tab is an interesting page. It differs from the main Google Search results in that:
- All webpages in these results are exclusively eCommerce product webpages.
- As a result, Google is able to pull a range of specific product information from those webpages, including product name, product rating, price, and retailer name.
- Both organic (unpaid) and paid (Shopping ads) product webpages appear in the Google Shopping tab.
In contrast, pages main Google search results will include any webpage - whether the website is eCommerce or not. Like the main Google Search and Google Images, paid Shopping ads appear at the top of the page.

The Google Shopping tab showing paid Shopping ads (in red) in the ad slots at the top of the page. Unpaid Shopping product results (in green) appear below the ads.
Google Display Network (with dynamic remarketing)
Through dynamic remarketing - AKA those ads that follow you around the web - you can serve users personalised ads based on specific products they viewed on your website.

Google Shopping ads serving on the Google Display Network via dynamic remarketing.
Dynamic remarketing merits a blog post of its own and is out of scope for this guide. If you'd like more information now, refer to Google’s official help guide:
What is Google Merchant Center?
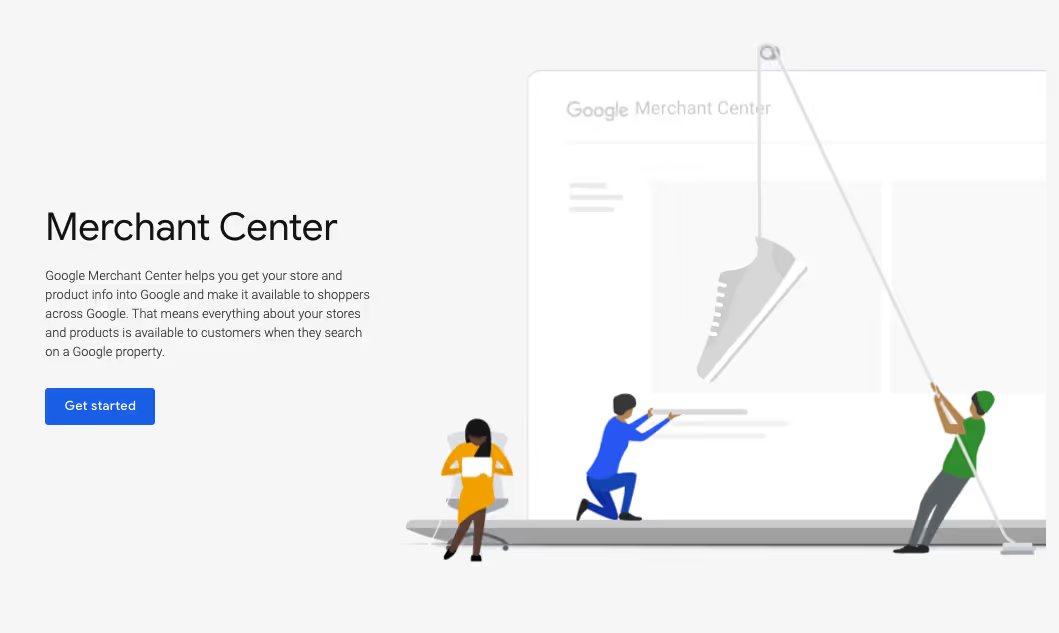
A Google Merchant Center account is required to run Google Shopping ads. Merchant Center acts as an interface between your product feed (where you upload and submit your product information) and Google Ads (where you publish and serve Shopping ads).All aspects of your products and product feed are managed in Google Merchant Center. All aspects of your campaigns, budgets, and ads are managed in Google Ads.
How do I set up a Google Merchant Center account?
Begin the sign up process at Google Merchant Center. Use the same Google account login that you use to access Google Ads, as you will need access to both under the same login in order to link Merchant Center to Google Ads. Enter your business name and enter the URL of your eCommerce your website.

Note that the business name you enter here will be the same as your Merchant Center account name, which is also the business name that people will see in your Shopping ads, so it’s important to get this right.
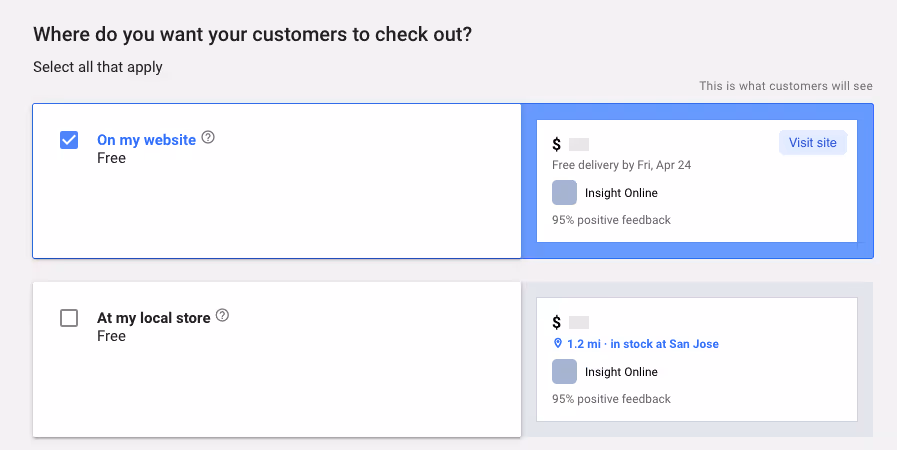
Next, you’ll be presented with two check boxes:
- On my website - since you’ll be selling products on your eCommerce website...you definitely want to check this box.
- At my local store - this relates to local inventory ads, which integrate your product inventory with your brick-and-mortar stores’ Google My Business listing(s). Unfortunately, this functionality is not yet available in New Zealand, so just leave this unticked. Hopefully Google introduces this feature to NZ in the near future. We’d be excited to try it out for our clients that operate brick-and-mortar stores.
Next, you’ll need to verify ownership of your domain to confirm ownership of your website with Google. There are 3 avenues to do this:
- Verifying via Google Analytics code on your website
- Verifying via Google Tag Manager code on your website
- Uploading an HTML code to your website homepage, or an HTML file to the website server
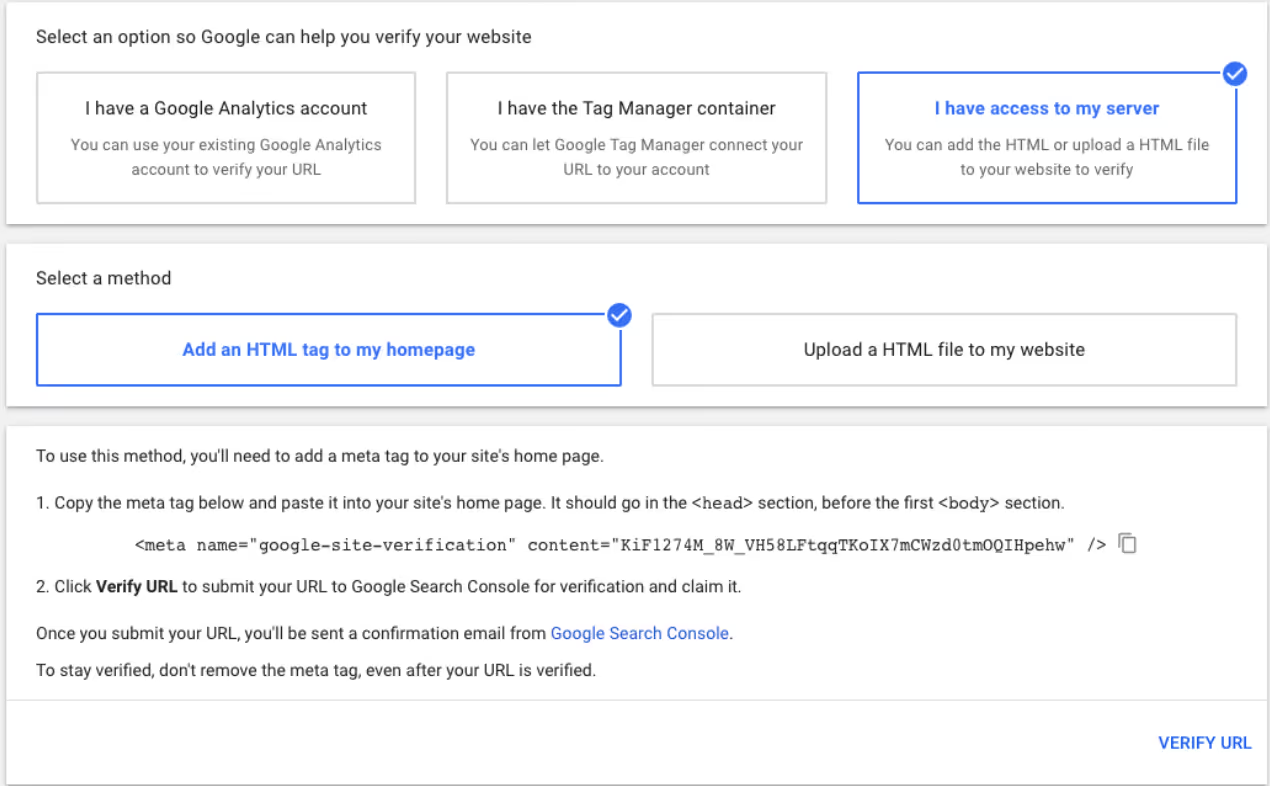
Your first choice might be to use the Google Analytics and Google Tag Manager options. It looks easier, and you probably already have access to those platforms. However, in our experience, these two verification methods can be quite buggy and tend to fail often. Our recommendation is to go with the third option, HTML verification; adding a HTML tag to the source code of your homepage, or uploading an HTML file to your website server. These methods are generally more reliable and we seldom encounter any issues with this approach. Once you’ve set up your Merchant Center account and verified your website, the next step is to create and upload a product feed.
What is a product feed?
A product feed is a digital list of all the products you’d like to sell on Google Shopping. A product feed includes a range of details for every single product, including the product name, price, and SKU ID. Product feeds are submitted to Google Merchant Center, and then integrated with Google Ads to be used in Shopping ads. Shopping ads are based on product information that you provide in the primary feed, so it’s crucial to have correct and up-to-date product data. Therefore we recommend using an automatically updating product feed which is updated on a daily basis. Google supports product feeds in XML and TXT file formats, among others.
How do I create a product feed?
There are a number of different approaches to creating a product feed. For most scenarios, there are three main methods we recommend:
- Direct integration with your eCommerce website - most major eCommerce platforms (e.g. Shopify, WooCommerce for WordPress) offer native integration with Google Merchant Center. This method generally works well out-of-the-box, requires minimal developer support, and is our preferred choice.
- Google Sheets product feed - creating a spreadsheet containing all product data. Merchant Center can link and automatically pull product data from the Sheet. This will require developer support.
- XML product feed - similar to the Google Sheet option above, but product data is formatted in a single XML file which is then uploaded to your website server. You can then tell Google Merchant Center to fetch it from your website server. This method will require developer support.
At first instance we recommend using direct integration with your eCommerce store. It’s faster, easier, and generally more robust. Alternatively, you’ll need to enlist your developer’s help to generate a product feed in Google Sheet or XML format. We’ll delve into more detail on this shortly. There are a range of product attributes that need to be configured in the product feed. Some of the most important attributes include:
- id - a SKU- like string of numbers and/or letters to uniquely identify each product.
- title - the product name / model
- link - the product URL on your website
- image_link - photo of the product
- price - the normal retail price
Note that some attributes, such as Availability, have standardised conventions that you need to conform to. In contrast, attributes such as Title and Image can be formatted as you like. For more information, refer to Google’s official help guides:
How do I upload a product feed to Merchant Centre?
Direct integration with Shopify, WooCommerce, etc
If your eCommerce platform offers native integration with Google Shopping, we highly recommend utilising it. This approach should generate a product feed, and keep that feed automatically updated. This is a very robust and low-maintenance solution on-going. You should be able to configure this all within your eCommerce platform. For more information, refer to:


Shopify's native integration with Google Merchant Center.
Otherwise, you’ll have to create and upload a product feed to Google Merchant Center yourself.
Creating & submitting your own product feed
In Merchant Center, look to the main menu to the left and navigate to the Products tab.
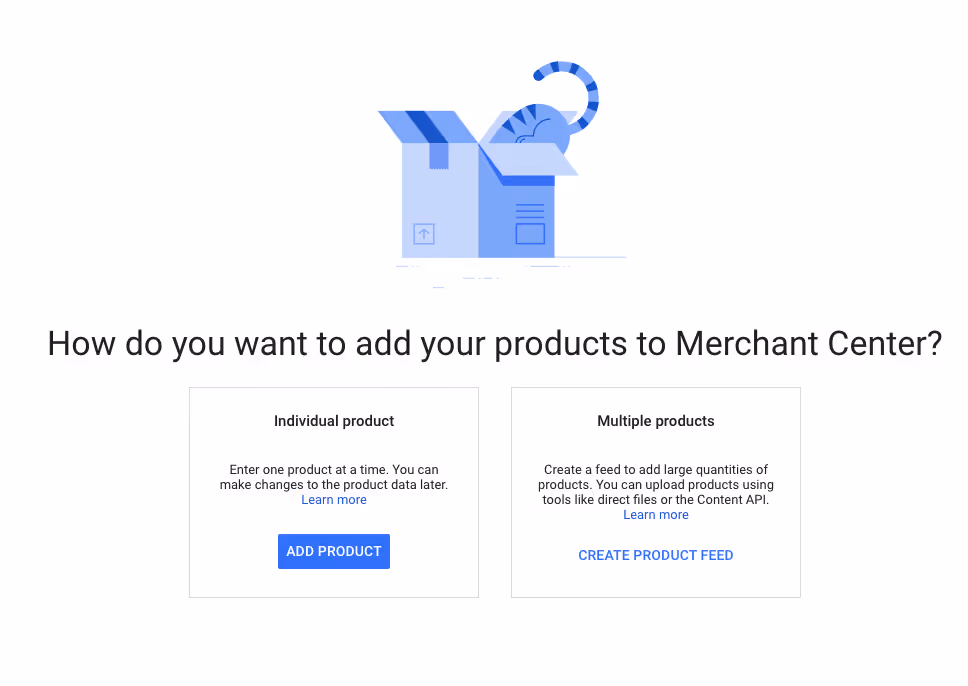
You will be presented with two options:
- Individual product - we strongly recommend against using this approach, unless you’d like to enter every single product manually...
- Multiple products - our recommended approach, enabling you to submit your product feed.
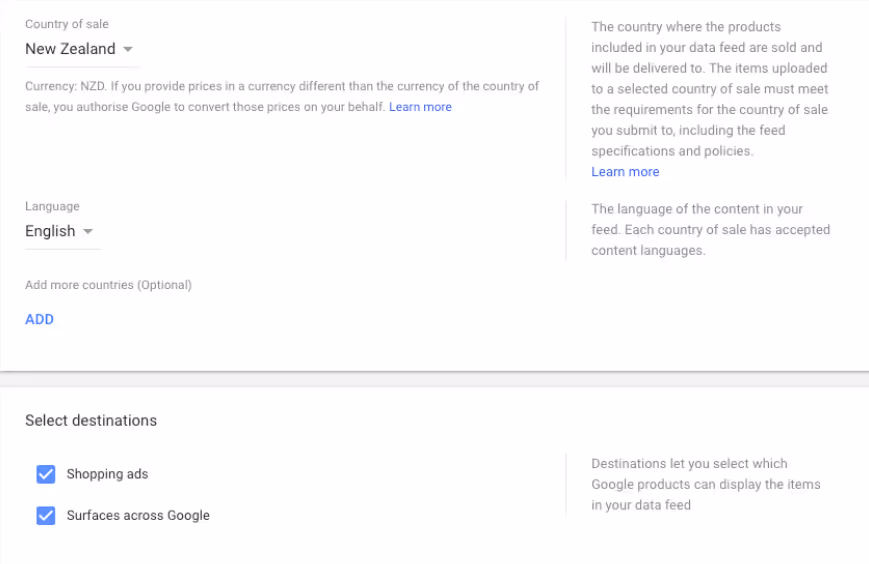
Next, complete the basic information fields:
- Country of sale: New Zealand
- Language: English
Select which destinations you’d like your ads to appear on. We’d recommend selecting both of these options to maximise your reach.
- Shopping ads - the ads that appear at the top of the Google search results.
- Surfaces across Google - a catchall term for a range of Google properties such as the Google Images tab, Google Shopping tab, etc. Opting out of this reduces your reach; in particular, it means your products won’t qualify to appear organically in the Google Shopping tab.
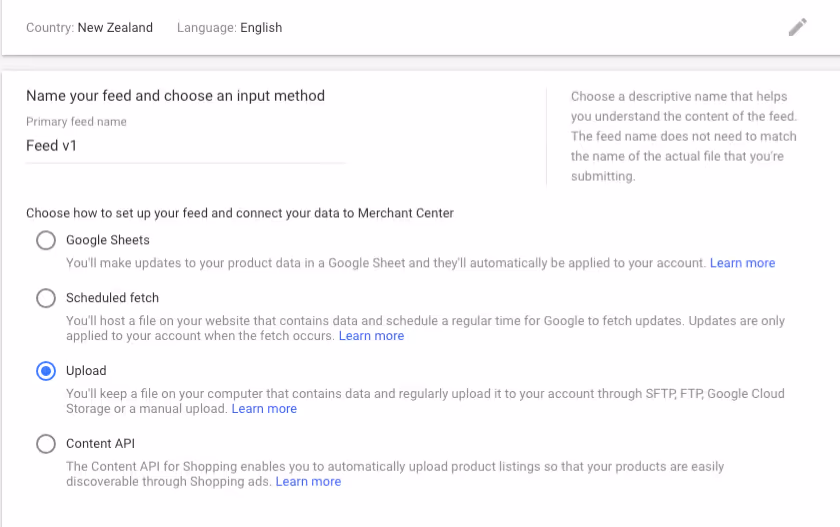
From here, you’re presented with four different options for submitting your product feed. In most scenarios, we recommend using the first two options - Google Sheets and Scheduled fetch - as they’re relatively easy set up and to troubleshoot.
Google Sheets
You will need to work with your developer to compile a Google Sheet containing your product feed, and ensure that Sheet is configured to automatically update. Once complete, select this method to link the Google Sheet and its product data to Merchant Center. Note that your Google account will require constant access to both the Sheet and Merchant Center. For more information, refer to Google’s help guides:
Scheduled fetch
You’ll need to work with your developer to create a product feed and upload it to your website server. Again, ensure the feed is automatically updating. Next, point Google to the location of the file to allow Merchant Center to access the product data.
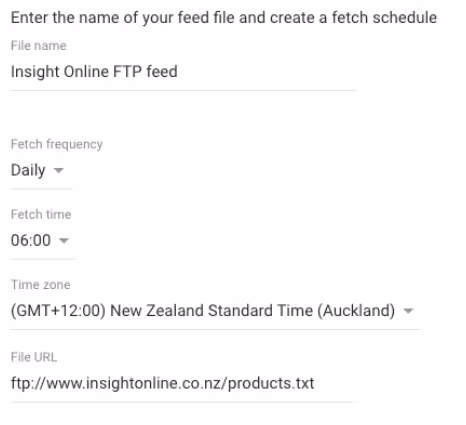
In the example above, we’ve uploaded our product feed via FTP to: ftp://www.insightonline.co.nz/products.txtWe’ve also scheduled for Google to fetch the latest product data from the file on a daily basis at 6:00am. We recommend using daily fetch intervals to ensure the most up to date product data is sent to Google Merchant Center (alternatives include weekly or monthly fetch intervals).For more information, refer to Google’s official help guide:
Upload
With the standard upload method, you’ll keep and update a TXT or XML file on your computer containing product feed data, and manually upload it to your Merchant Center account. We recommend against this method as it poses a relatively high risk of failure, reliant on a single user’s computer. Plus, do you really have time to manually upload a file, potentially to 4 times a day? We believe in automating as much of the process as possible. A scheduled fetch upload is a much more efficient solution and requires less maintenance on-going. For more information, refer to Google’s official help guide:
Website crawl
This is a relatively new method where Google crawls your website to pull structured data (schema) from your webpages. You’ll need to have implemented structured data markup on your website in order for this to work. We approach this method with a healthy dose of skepticism, particularly when we’re dealing with product data that’s constantly changing. For example, it’s not clear how often Google will crawl the website, and it’s difficult to troubleshoot product data that comes through. There are many points of failure - for example, what if a discounted product price from an outdated crawl serves an ad with the incorrect price to a user, when that product is actually at full RRP? We continue to recommend creating your own product feed to ensure you have full control over all elements of your product data. For more information, refer to Google’s official help guide:
Content API
The Content API for Google Shopping lets you programmatically manage your products, querying items and inserting, updating, and removing them in your Google Merchant Center account. This is an advanced product feed solution designed for developers who want to integrate their applications with Google Shopping. Due to the complex nature of the Content API, we won’t be exploring this method in this guide. If your developer has know-how and experience in programming applications, or you’d like to know more about this method, please refer to:
How do I link Google Merchant Centre to Google Ads?
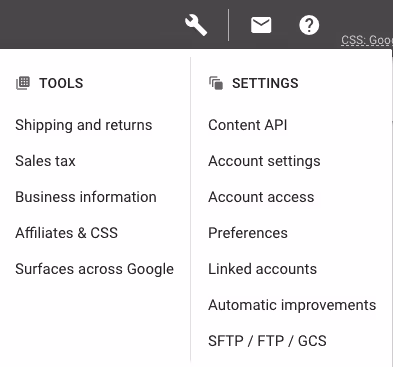
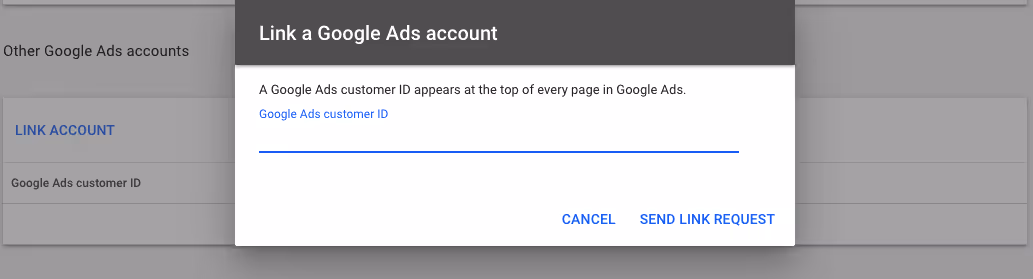
In Merchant Center, navigate to the spanner icon towards the top right. Under Settings, go to Linked accounts.
Enter your 10-digit Google Ads account ID to link Merchant Center with your Google Ads. This will enable product feed data to flow through to Google Ads to be used in Shopping ads.
For more information, refer to Google’s official help guide:
How do I set up a Shopping campaign in Google Ads?
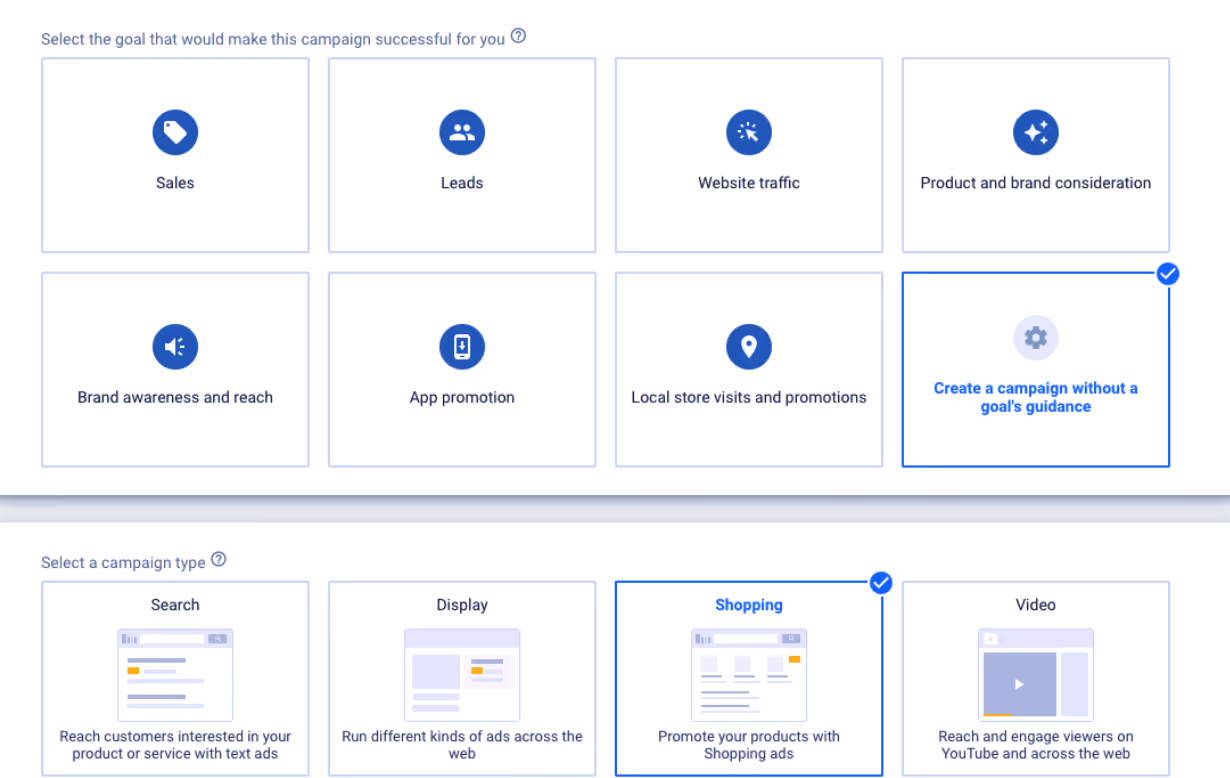
In Google Ads, create a new campaign - without a goal’s guidance - and select the Shopping campaign type.
Your linked Merchant Center account should automatically appear.If this doesn’t happen for you, go back to Merchant Center and double check that the Google Ads link processed correctly.
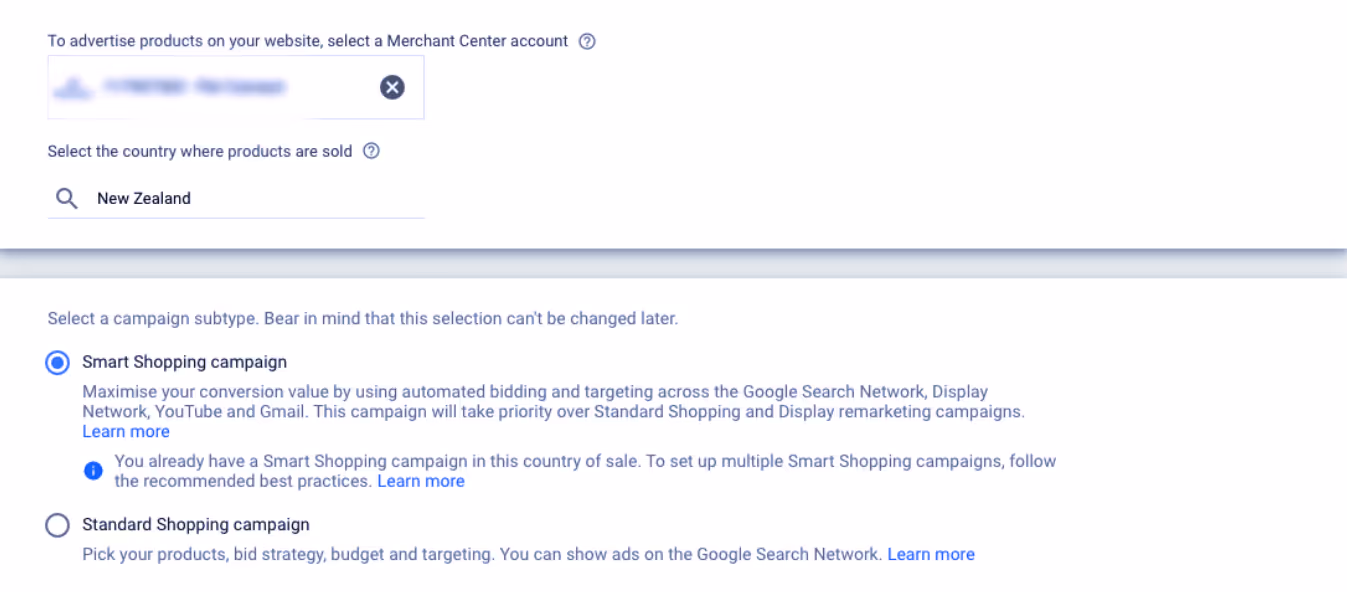
We recommend using the Smart Shopping campaign type, as you’ll
- Be able to set up your campaign in a short amount of time
- Benefit from Google’s machine learning capabilities to serve ads in the most effective ad slots and maximise traffic & sales for your budget
- Maximise exposure with greater ad reach across all properties such as Google Search, Google Display, YouTube, and Gmail
The Standard Shopping campaign type is still available as an option. We are expecting Google to phase this campaign type out in the near future, in line with their shift to fully automated strategies. Standard Shopping campaigns are like driving full manual. You get more control, but conversely, you’ll have to put in more work, such as selecting your products, bid strategy, and targeting. Your ads will only be eligible to show on Google Search, limiting your ad inventory. For most businesses, we don’t see any significant advantage to using a Standard Shopping campaign, as you have to put in more time towards micromanagement of the campaign, you miss out on leveraging Google’s algorithm, taking up more of your time and reducing your reach.
Campaign settings
Some elements you’ll need to complete as part of your Shopping campaign setup include:
Campaign name
- Name it something logical.
- Note this can be changed at any point.
Country of sale
- This integrates with your Merchant Center product feed “target country” field – so, New Zealand.
- Note that later on in the campaign setup process, you can further restrict your ads to appear only in specific regions or cities (e.g. Auckland, Hawkes Bay).
Maximum CPC
- In our experience, the average cost-per-click on Shopping tends to sit at the $0.50 mark.
- To begin with, we’d recommend setting your limit at $1.00.
Daily budget
- This will depend on your specific budget.
- It’s difficult to say how much your Shopping campaign will spend. It’s dependent on a variety of factors including your business niche, demand in your industry, and the size of your product feed.
- For a New Zealand SME, ad spend in the region of $300 – $500/month might be a good place to start.
Target ROAS
- The average “return on ad spend” you’d like Google’s machine learning algorithm to configure your campaign to achieve.
- For example, if you’d like to earn $10 in revenue for every $1 of ad spend, you’d set the ROAS to 1000%.
Linking the product feed
Smart Shopping campaigns automatically link your primary product feed from Merchant Center. In the perfect world, all this goes swimmingly. But if you do get stuck or don't have the time... please reach out, we are happy to help.

Want instant updates when we release new blogs?
Never miss out again - sign up to our newsletter. Get the latest news, resources and marketing tips straight to your inbox. We won’t share your details or spam you. Unsubscribe anytime.