

4 Methods to Track HubSpot Forms in Google Tag Manager
Have you hit a roadblock trying to Hubspot forms through Google Tag Manager? Here are 4 methods you can try.


Using embedded HubSpot forms on your website?
Although HubSpot is a great CRM for growing your customer database for your marketing activities, it can be a challenge to set up a trigger for Google Tag Manager to capture the event so you can measure it in Google Analytics.
When a form is embedded on a web page from a third party like HubSpot, the form code can be hidden from Google Tag Manager. This means that Google Tag Manager won’t be able to “read” any form id or form class code to fire a trigger. This is why you may be finding it hard for a form submission to fire with the usual Form Submission trigger.
Some issues you’ve probably come across could be:
- You have multiple HubSpot forms on your website and they all use the same form id or class.
- Google Tag Manager is blocked from “reading” any HubSpot form events.
From a lot of trial and error I’ve found 4 other methods to set up tracking of your HubSpot forms in Google Tag Manager:
- Redirect to a Form Success Page
- Add a Data Layer Snippet
- Trigger with Element Visibility - CSS Selector
- Custom HTML HubSpot Success Listener Tag
Why bother setting up tracking in GTM when you can see the data in the HubSpot CRM?
- To consolidate your HubSpot data in Google Analytics. This saves you the headache of pulling together data from multiple sources to see how your channels are performing.
- Having all data streamlined in Google Analytics means you can set up non-converting remarketing audiences to use in Google Ads.
- Setting up form submission tracking in Google Analytics will allow you to seamlessly import conversion tracking into Google Ads.
Method 1: Set up a form success page
The easiest and most accurate way to track any form let alone a HubSpot form is by redirecting a form submission to a form success page. Simple enough for the website developer or yourself to set up, setting up a unique form success URL will show the most accurate results as this page can only be viewed after submission.
There’s an option in the HubSpot CRM to redirect form submissions to the success page.

Set up your trigger type in GTM as a “Page View” and for the trigger to fire on “Some Page Views”. Choose “Page Path” and “equals” in the drop downs then insert whatever the form success page URL is.

The tag can be set up as your usual event type, use category and actions that make sense to you.

Method 2: Adding a data layer snippet to your HubSpot Form
If a website developer is easily accessible, this is another easy option for you to set up form tracking. Without going too into detail, a dataLayer.push is a bit of code your website developer can add to the form so third party tools like Google Tag Manager can read it. This essentially overrides the form’s information being blocked by HubSpot. We recommend this option if you have forms in the footer across the site like a newsletter sign up.
To set this up, quite simply ask your website developer to add a data layer like the example below:
<script>
window.dataLayer = window.dataLayer || [];
window.dataLayer.push({
'event': 'new_subscriber',
'formLocation': 'footer'
});
</script>
Swap out the event trigger from ‘new_subsciber’ to whatever makes sense for you and omit 'formLocation': 'footer' if this is normal page form.
And to set up the trigger in Google Tag Manager, use the trigger type “Custom Event”, use whatever “Event name” you have chosen in your data layer. The example below shows a set up for a newsletter subscription form that is found across the site.

The tag can be set up as your usual event type, use category and actions that make sense to you.

Method 3: Set up an Element Visibility Trigger
If you’re not wanting to redirect a form completion to a success page or have a website developer to add a data layer, using an element visibility trigger allows you to track whenever a specified element appears on the screen, like a thank you message displayed on the same page after submitting a form.

Firstly, submit a test form to see the thank you message. With your mouse highlight the message and right-click to select “inspect”.

Right click to "inspect"

You should see the class used before the thank you message.

Div Class

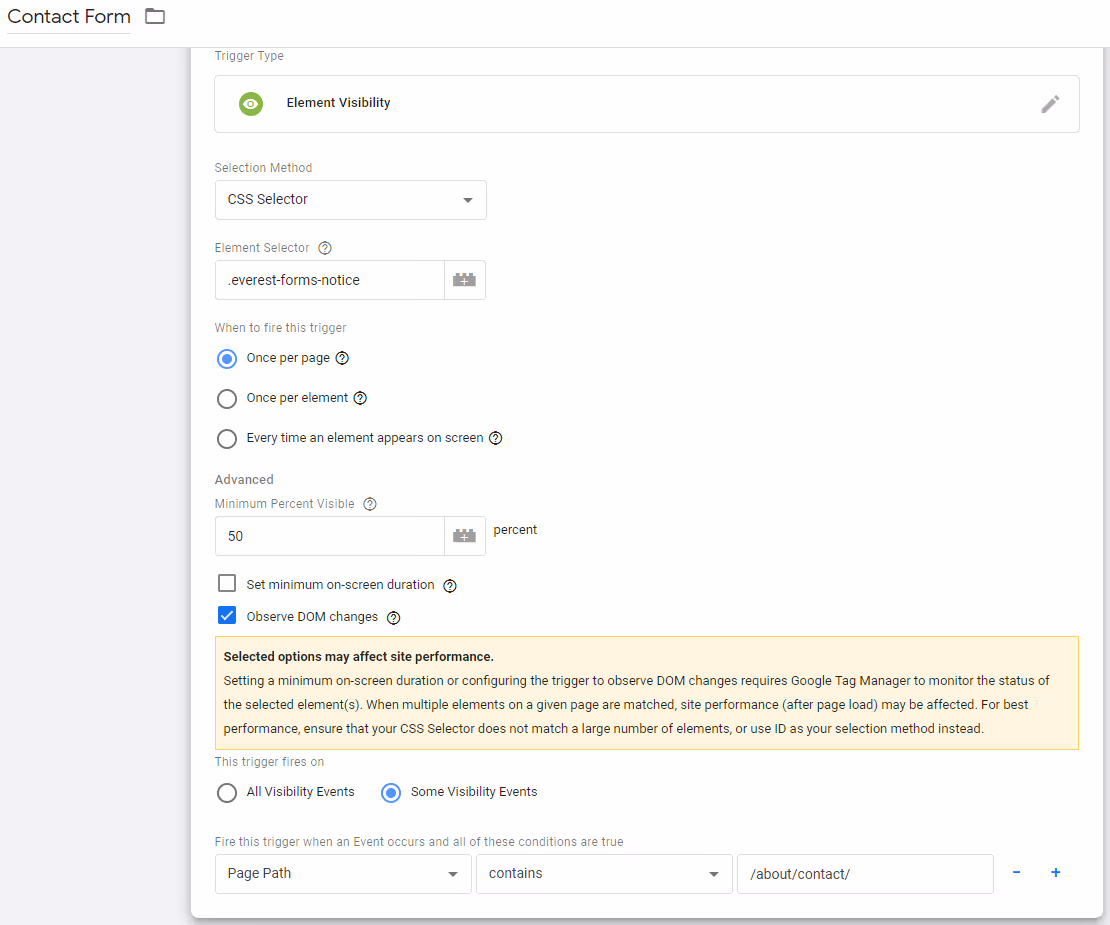
Now that you know what class to use, create the trigger as an “element visibility” trigger type and choose “CSS Selector” in the dropdown.
In the element selector section, add whatever class is used in the thank you message. Make sure to put a full stop before. This let’s Google know you're triggering a class. Choose to fire the trigger “Once per page” With the minimal percent visible as 50 percent. This means that at least 50% of the thank you message needs to be visible on the screen for the trigger to fire. And lastly click “Observe DOM changes” and “Some visibility Events''. Add the page path the form is on.
The tag can be set up as your usual event type, use category and actions that make sense to you.

Method 4: Set up a Custom HTML HubSpot Listener
If none of the options above work for you, I’m sorry I’ve been there too. Using a HubSpot Success Listener is probably the most complicated way to set up HubSpot form tracking, involving a few steps.
Warning, this one gets a bit technical...
Firstly, we’ll need to create a Custom HTML tag calling it “Forms - HS Success Listener” and pasting the code below:
<script type="text/javascript">
window.addEventListener("message", function(event) {
if(event.data.type === 'hsFormCallback' && event.data.eventName === 'onFormSubmitted') {
window.dataLayer.push({
'event': 'hubspot-form-success',
'hs-form-guid': event.data.id
});
}
});
</script>
Set the trigger as all page views.

Next, a new variable will need to be created. Go to Variables on the left menu. Under User-Defined Variables click “New”. Name it “Forms — hs-form-guid” and select the variable type as “Data Layer Variable”. Add “hs-form-guid” as the Data Layer Variable Name. And click “Save”.

We’ll also need to create a second variable called “HubSpot Form Lookup Table”. This is where you will need to list all your HubSpot forms along with their allocated form ID’s. This can be found in HubSpot under Marketing>Lead Capture>Forms and exporting the data into a CSV file.

Choose “Lookup Table” as the variable type and populate the lookup table using the data from the CSV export. Form ID as “Input” and “Output” as the Form Name.

Lastly the Trigger and Tag will need to be set up. Use “custom event” as the trigger type. I suggest to name it “HubSpot Form Submission All”. And add the Event name as “hubspot-form-success”. Firing on “All Custom Events”.

Setting up the tag for this trigger, use the usual event track type. Suggest to use “Hubspot Forms” for the Category and the new variable we just created “{{Hubspot Form Lookup Table}}” as the Action. Label should be {{Page Path}}.

With the custom HTML tag initially set up, this should be able to pull the form name by looking up the Form ID triggered by the HubSpot Lookup Table variable created.
Need help setting up form tracking on your website? Feel free to get in touch with us, we’re happy to help!

Want instant updates when we release new blogs?
Never miss out again - sign up to our newsletter. Get the latest news, resources and marketing tips straight to your inbox. We won’t share your details or spam you. Unsubscribe anytime.